Hello friends, Today let’s see how we can create a paint
application step by step using Windows Form and C# DotNet in Visual Studio.
Prerequisites
- Basic c# programming knowledge
- Basic windows form application development knowledge
- Visual studio 2010+
Step
1.
Start a new Windows Form Project in Visual
Studio which will provide you the default form template.
Add a picture box into the form (drag and
drop picture box into the form from the toolbox in the left side) and modify
the size property as shown in the below screenshot.
Step
2.
Add code to create the paint canvas and
show it in the picture box using the bitmap and graphics classes.
The bitmap class is used to create and
handle the image and the graphics class is used to draw things into the image.
Let’s run the application to see if the
bitmap and graphics classes really helps to load the canvas.
Step 3.
Let’s see how we can write code to draw a
line in the canvas. We give two fixed points in the code to draw the line.
Let’s run the application now.
Now let’s create mouse action events (In
visual studio if you click ‘Tab’ button twice after typing ‘+=’ it creates
dummy template for the events. For example, as you see in the below screen type
‘pictureBox1.MouseDown’, type ‘+=’ then click on ‘Tab’ button twice which will
create the event ‘pictureBox1_MouseDown’)
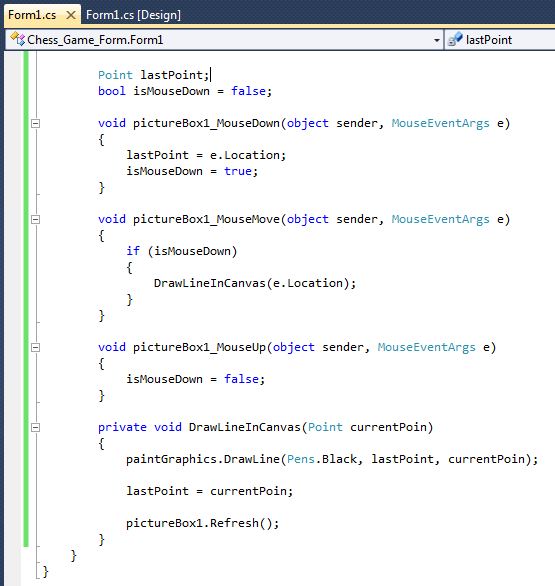
Now let’s define the events and modify the
code in draw line method.
Here the current mouse point location is
stored into the variable ‘lastPoint’ when the mouse down happens and on each
mouse move event the draw line method is called and the ‘lastPoint’ is updated
with current mouse point location which will draw small lines between each
points. The ‘isMouseDown’ bool variable helps us not to draw lines when the we
are moving the mouse without pressing it down.
As the screenshot shows it gives a clean
drawing effect even though they are small straight lines drawn in between.
Step 4.
Drag and drop a button and tracker bar from
the tool box which can be used for choosing the color and size of the pen for
drawing.
Add button click event to show the color
picker and update the draw line method to take the color and size values from
the color picker and tracker bar for drawing the line.
Let’s run the application to see if the
color and size codes works.
Step 5.
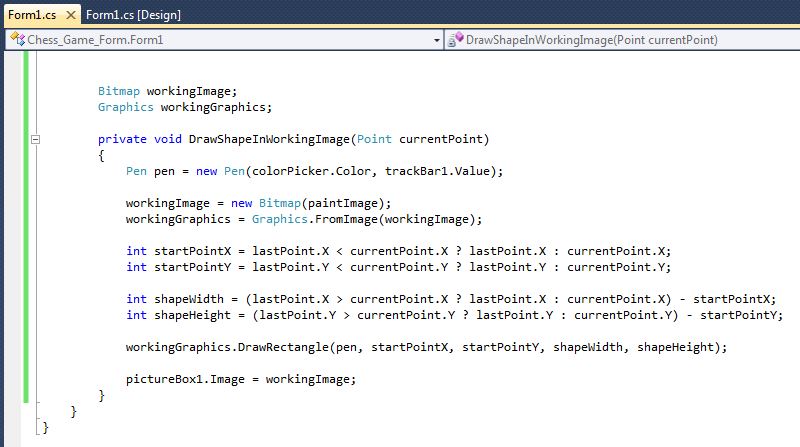
Add code to draw rectangle.
Drawing rectangle is different from drawing
line. As we have to show the rectangle in the canvas while dragging the mouse,
but the real rectangle is drawn only when we leave the mouse button. So, we
will have an additional bitmap (‘workingImage’) and graphics to be used when
the dragging is on.
We have some logics for calculating the
start x and y values in the code as the start point may not be the mouse down point
always. The following screen will probably give more idea on the same
Now let’s update the mouse events to draw
rectangle and update the real canvas image (‘paintImage’) with the working
image.
Let’s run the application and see if the
rectangle drawing really works.
As the screenshot shows the rectangle
drawing with size and color picker works all well.
Visit Part - 2/2 To see how we can add
provision to draw more shapes (Circle, Triangle and line), fill color in the
shapes and draw outlines while drawing shapes.
Part - 2/2 URL :
https://playwithcsharpdotnet.blogspot.com/2020/03/develop-paint-application-using-basic-csharp-graphics-codes-part-2.html
https://playwithcsharpdotnet.blogspot.com/2020/03/develop-paint-application-using-basic-csharp-graphics-codes-part-2.html
Enjoy Coding...!!!


Comments
Post a Comment